Saturday, April 24, 2010

Tomato Fried Rice

I really love the seasoning I bought for SGD 2 in all-2-dollars-shop.... Taadaahh!!

It's called Aji Shio Kosho (Salt & Pepper Seasoning). You can use it for soup or fried rice. Coz I bought this, so I experimenting it with my fried rice. My usual recipe for fried rice:
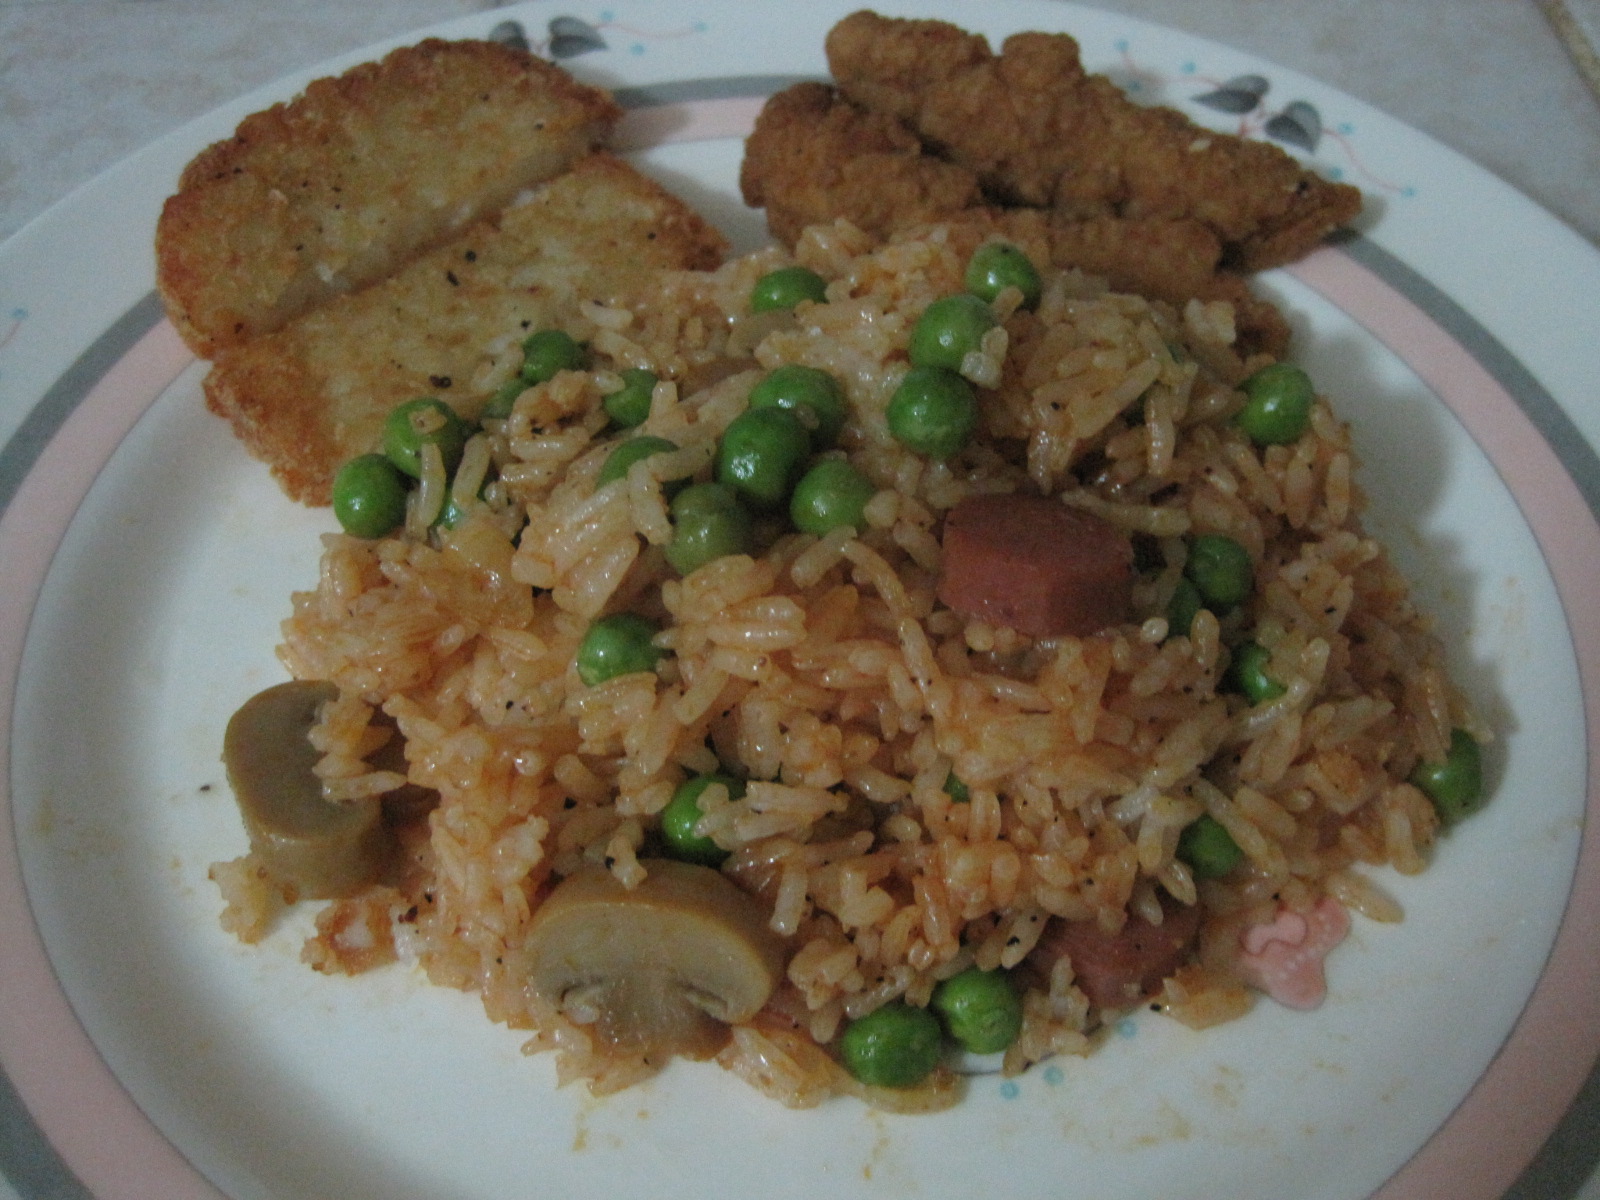
1. Sausage
2. Green beans
3. Button mushrooms
4. Cooled off rice
5. Olive oil
6. Aji Shio kosho
7. Tomato sauce

How to cook:
1. Pour boiled water on the green beans and let the beans soften.
2. Heat the pan with olive oil.
3. Stir fry green beans, button mushrooms and sausage together.
4. Once the ingredients are mixed together, put the rice in, and stir fry all of them together for a while.
5. Add tomato sauce and mix with the rice thoroughly.
6. When it's almost done, add aji shio kosho in, and mix them well.

Once everything is well-mixed, turn off the flame, and THAT'S ALL! You can serve your super simple but nice fried rice. You can add other side dish as you like together with the rice, like fried egg, chicken finger, or nuggets.


Happy cooking!


Honey Pan-Grilled Chicken

First of all, I won't suggest this recipe, unless you have quite a bit of time to make it. Pan-grilled stuff really takes a lot of time (based on my experience), unlike deep fry or stir fry.

However, this recipe got an ENCORE request from my hubby! *Proud*

It's not that complicated actually, you just need to spend a little more time to cook it. I learnts it from Ingrid, but I kind of modified it a little bit =P

What you need is:
1. Oyster sauce
2. Salt
3. Sugar
4. Soy sauce (both light and dark soy sauce)
5. chopped garlic
6. honey rock sugar (Another option is raw honey)
7. Chicken (with bones)
8. Olive oil
9. Butter

How to prepare it:
1. Marinate the chicken with oyster sauce, both soy sauces, a little bit of sugar, and chopped garlic. I put quite a bit of garlic, because I love the smell. The amount of chopped garlic is totally up to you, depends on your taste.
2. Marinate the chicken for at least 30 minutes. I love marinating the meat overnight, because the taste will be much more wonderful.
3. If you use honey rock sugar, dissolve it on a pot with water. Keep the flame small, when dissolving it. Once it's dissolved, don't off the flame, as you need to keep it hot. Otherwise, the rock sugar will be thickened again.

To grill the chicken:
1. Heat olive oil and butter together on the pan. Mix them together.
2. Once the oil is hot and the butter is dissolved, put the marinated chicken and grill it.
3. When the chicken is almost done (about 75-85% done), brush the chicken with the honey. I was too lazy to brush each and every chicken, thus, I pour the honey on the chicken directly, and turn the chicken upside down frequently, until it's done.

Enjoy!

Tuesday, April 20, 2010

Sushi Roll

Previously, I shared some of my experiments in making sushi rice and tamago. To make sushi roll, it's super easy, when you use this tool. I never use bamboo roll before, but I believe, this is tool is much easier than bamboo roll.

Okay.. Straight to the point... This is the magic tool...


What you need to make sushi:

1. Nori sheet/Seaweed sheet

2. Sushi Rice --> Click HERE how to make sushi rice
3. Filling
- For filling, you can use anything you like. e.g: cucumber, tamago, tuna fish, salmon fish, crab stick, etc.
- I use salmon chunk, tamago and slices of cucumbers. Click HERE on how to make 2 minutes tamago
4. The magic tool to make the sushi roll :)


The steps are really simple. The tool has 3 parts, let's call it Part A, B and C.


Before you start, ensure that the three parts are wet. This is to prevent the sushi rice to stick on the tool. Then, what you need to do is:
1. Fill Part A with sushi rice, but make the kernel at the center side, to fill in your fillings.
2. After that, fill in with the stuffs you want to fill in, at the kernel you make.
3. After that, place Part A inside Part B, then fill Part B with rice.
4. Once it's full, close Part B with Part C, to make a roll. Ensure Part A and Part C have no gap when you close it.
5. Take the rice roll out, and wrap it with nori.

After that..... Taa daaa.... Here's how it looks like....


Use a sharp knife to cut the sushi roll in pieces. And you are ready to serve your homemade sushi. :)

Saturday, April 17, 2010

Survival Food: Spaghetti ala You!

Spaghetti is always the type of food that I will cook, if I'm too tired, too lazy or too busy. I call it, survival food =P

I believe, everyone's home should have these, just in case, you can't get any food when you are super hungry.

You just need a pack of spaghetti. This is the brand I normally use... It allows about 6 servings per pack.

And... Any type of spaghetti sauce you like. My hubby only like this, but I would love to try Carbonara once.

To prepare it, here's the simple ways:
1. Boil the spaghetti. Add a little bit of salt into the water, to add a little flavor. But this is optional.
2. Once it's done, put the noodles on the plate, and get ready to prepare the sauce. :)

For the sauce, you can stir-fry any minced meat you want. I normally use chopped chicken sausage. Here's how:
1. Heat the olive oil, and add the chicken sausage.
2. Stir fry them until it's well-done, and turn the flame to small.
3. Pour the spaghetti sauce and mix it with the chicken sausage, and heat the sauce until it's hot at low heat.

Once it's done, just pour the sauce on the spaghetti, and here you go....

Tips: You can add black pepper or pepper if you like ;)

Black Pepper Chicken with Potato

Black pepper chicken is my husband's favorite dish, and most importantly (for me), it's super EASY to make, plus the ingredients are super cheap.

All you need is just:
- Chicken fillet
- Chopped garlic
- Potatoes
- Sweet soya sauce
- Light soya sauce
- Black Pepper
- Corn flour
- Water

First step is, you need to marinate the chicken. Just cut the chicken into dice-sized and mix both soy sauce and black pepper on it. For the details about how to marinate chicken, you can read this.

Click here.

Now I'm working, so, I normally marinate the chicken one day before cooking, wrap it, and leave it in the fridge over night.


How to cook:
1. Boil water and put the potatoes in the boiled water, until it's half-cooked.
2. Cut the potatoes into dice-sized, and leave them aside.
3. Heat the oil (I use olive oil)
4. Stir-fry chopped garlic
5. After it's fragrant, put the marinated chicken on the pan and stir fry it until it's cooked.
6. Put the potatoes in the pan, and stir fry them with the chicken.
7. Lower the flame, and add in a little bit of water. Then mix them well.
8. Close the pan for a few minutes and turn off the flame.


And here you go the black pepper chicken with potato!


Tips:
- If you like spicier and sweeter, you can add dark soy sauce and black pepper, after adding water (step 7). If you like it salty, you can add a little bit salt or light soy sauce.
- The ratio of chicken and potato is 2:1 in general. But that depends on what you like, you can put equal amount of chicken and potatoes as well. :)


Happy trying!

Monday, April 12, 2010

Salmon Mayo & Egg Wraps

If you are looking for an easy and quick making breakfast, you may want to try Wraps. You can wrap varieties of food and have a great and healthy breakfast!

So far, I have tried Salmon Mayo & Egg wraps, and it tastes good. Straight to the point, so here's what you need:

1. Wraps. You can heat it directly on the fire (so it will taste a little bit crispy), or you can heat it in microwave for 1 minute (that's what I did).

2. Salmon

I used "Ayam Brand" canned salmon mayo. I personally don't think salmon mayo is suitable for the wraps, I should have tried the light version of the canned salmon.

If you guys want to use salmon mayo, don't spread too much of the salmon mayo on the wrap. Otherwise, it will taste too rich in flavor.

3. Omelette

What you can do:
- Beat the eggs and mix them well
- Add in a little bit of salt, pepper and soy sauce. Don't put too much soy sauce, it will make the egg turn too dark in color.
- Heat the frying pan and oil.
- Stir fry any ingredients you want to mix with the omelette (For example, I used chopped onions and sliced button mushrooms).
- Pour in the beaten eggs, and stir fry the eggs.


How to wrap:
1. Spread the salmon mayo/salmon chunk on the wrap.
2. Spread the omelette on top of the salmon.
3. Ensure that the spread is at bottom half of the wrap, and you don't spread it at its edge.
4. After that, wrap the bottom part of the wrap (the part that's closest to you), then wrap the two sides of it (the side with the salmon chunk and omelette).
5. Roll it towards the top half that doesn't contain any spread. Or you can choose not to roll it up.

And here you go, your salmon & Egg Wraps....


Enjoy!

Ginger Chicken

This is one of the favorite dishes of my hubby. He likes ginger chicken a lot. So, I made one for him (and myself) like this!


In order to make the ginger chicken ala "ME", all you need is just the magic packet of mixed ingredients. I used Woh Hup, and it tasted nice.


What you need to do is, cut the chicken in pieces, and marinate the chicken with the ingredients for at least 30 minutes. After that, here's a few simple steps:
1. Heat the frying pan, and the olive oil.
2. Stir fry the chicken until it's fragrant, then add in the vegetables you want to use.

In the packet, they use carrots (you may need to boil the carrots half-cooked first, before stir fry them), cauli flower and peas. It's totally up to you and your creativity. But you may need to watch the amount of vegetables you want to add in. Make sure, the chicken is still the main ingredient, not the vegetables.

After trying Woh Hup, I will recommend this brand to you, if you want to try Ginger Chicken. The ginger chicken doesn't taste too strong (I dun normally like an over-strong ginger smell).

And... Woh Hup is Halal too... So, it's safe for Muslims....


Sunday, April 4, 2010

Tamago in Microwave

If you are super busy person, but still need to cook for your family, this recipe can be super helpful. You can make this in 5 minutes, I swear!

You just have to sacrifice the presentation of the tamago, as it won't look so smooth and nice looking. But who cares, when the taste is the same, right? :)

Here's what you need:
1. 2 eggs
2. 1 tablespoon of Mirin (I don't have Mirin, so I use grain vinegar)
3. 3/4 tablespoon of sugar
4. 1/2 dashi stock (I don't have dashi stock as well, so I use chicken stock)
5. One or two small drops of light soysauce.


Here's how you make it:
1. Beat the eggs and mix all the ingredients into the egg, and mix all together.
2. Put the mixture on microwave container (preferably on the square-shaped container, if you want to make tamago sushi later)
3. Put inside the microwave, and heat it in high temp for 1 - 1.5 minutes.

And there you go the tamago...


You can cut the tamago nicely to make tamago sushi as well. Click here to see the recipe for sushi rice.

Happy trying!

Sushi Rice

You don't have to use Japanese rice to make sushi. Normal rice will do. All you need is, a few additional simple steps. Here's how:

1. Cook 2 cups of rice like normally you do it. If you never cook rice, here's some tips (Click here)
2. As soon as the rice is cooked, quickly scoop them out into a big bowl and separate them to cool it down.
3. While waiting for the rice to cool down, mix 5 tablespoons of rice/grain vinegar, 4 tablespoons of sugar and 2 tablespoons of salt into a pot.
4. Heat the pot in a small flame, and stir it, to mix those three ingredients together.
5. Once all are mixed together, pour it on the rice gradually, and mix it well.
6. Ensure that the rice is not too wet/sticky after mixing it.

And there you go, your sushi rice..... Isn't it easy? =)


Konnyaku Jelly

If you want to try some simple, healthy and nice dessert, you can try Konnyaku Jelly. Konnyaku is actually the brand of the jelly powder I normally use. Click here if you want to know what does Konnyaku Jelly look like.

Pre-requisite tips for making a more healthy jelly:
1. Use the colorless powder. It's always healthier choice to use the colorless rather than red, green, yellow color type of powder. With the colorless, it's always nicer presentation to fill in some cut fruits in the jelly.
2. Use jelly powder, instead of agar-agar. Jelly powder is more "elastic". Konnyaku brand is the most recommended.
3. Citric acid and liquid color are not really a must. You don't have to use it, if you just want a simple dessert.


What do you need:
- 1 sachet of Konnyaku jelly
- 950 ml water
- 200-250 grams of sugar
- cut fruits of your choice (My hubby and I prefer nata de coco)
- moulds for jelly (normally one sachet of jelly can be create 24 pieces of moulded jelly)

How to make the jelly:
1. Mix the powder and sugar together.
2. Pour the mixture into the water gradually, and keep stiring until the water is boiled.
3. Turn off the flame and keep stiring for around 5 min, until the bubble disappears.
4. Put the pieces of the cut fruits in the moulds, and pour the Konnyaku into the moulds.
5. Let it chilled inside the moulds, before refrigerating.


When it's done, take the jelly out of the moulds, and you can serve them like this...


Thursday, April 1, 2010

Dried Beancurd Soup

This is my all time favorite homemade soup. If I remember correctly, my two brothers also love it. So, it's safe to say that, "Easy cooking soup to win your (boyfriend's) kids' heart can be beancurd soup." Well... Of course if you make it right. :)


Main ingredients:
- Beancurd
- Carrots
- Chicken Broth
- Salt

What you can add in:
- Meats (Chicken or pork)
- Tofu
- Pepper

How to make it:
1. Tear the dried beancurd into smaller pieces, and soak in the cool water.
2. Boil the water, and put the carrots in the boiled water.
3. When the carrots are half cooked, put the meat and(or) tofu.
4. Put the salt and chicken broth. The amount of chicken broth is normally more than salt.

And.... Your soup is done! Happy trying!

Sunday, March 28, 2010

Stir-Fried Spinach

The simplest, healthy, yet my favorite dish is stir-fried spinach. It's really really easy. Let's get to the point on how to prepare =)

What do you need:
1. Spinach (of course)
2. Chopped Garlic
3. Salt
4. Chicken broth powder
5. Vegetable oil


Let's cook it!
1. Heat the oil up and stir fry the chopped garlic until it's fragrant. The amount of chopped garlic depends on your preference.
2. Add the spinach into the pan, and stir-fry it.
3. When the green is done, add a little bit of salt (half tea-spoon for the servings of 2) and chicken broth (about 1 to 1.5 teaspoon). Stir fry it and off the heat.

PS: For other greens, you may need to add in some water, but for spinach, water is not required.

And... you are ready to serve your healthy dish!


Cashew Chicken

This is one of my favorite dish and last week, hubby praised my cashew chicken has finally improved and tasted real good! *Proud*

I still got a few more dishes to blog about. So, here we go:


What you need:
1. Chicken fillet
2. Cashew Nuts
3. Dried Chili (Since my hubby doesn't like the smell of chili at all, so I substitute this with Green pepper, which he doesn't like either)
4. Dark Soy Sauce
5. Light Soy sauce
6. Black Pepper
7. Vegetable Oil
8. Corn Flour


How you cook it:
1. Cut the chicken fillet into dice-size and marinate it like this.


Click here to know how to marinate the meat.

2. While the meat is marinated, fry the cashews (if your cashew nuts are raw). Heat the frying pan, and fry the cashew (without oil) on a low heat. You have to keep stirring them, otherwise, the cashew will be overcooked at a side.


How much of cashew nuts really depend on you. I normally put this much (as per the picture) for 300 gr of chicken fillet.

3. After the cashew is done and the marinating is over 30 minutes, you can start cooking your cashew chicken. First, heat up the oil, then stir-fry the marinated chicken. When the chicken is almost cooked, add the green pepper (dried chili) and cashew nuts. Since hubby likes it a little bit saucy, I added a little bit of water (just a little bit).

If you like it salty, you can add a little bit of salt and stir fry it, before you off the flame.

And that's how the cashew chicken is done....


Key to Delicious Simple Chinese Food

My 3 months experience of cooking teaches me that, one of the keys to successfully delicious dish is, Marinate the meat. If you marinate the meat well, I would say that, you can guarantee that the dish is definitely nice, or at least, edible.

Let's say you want to make black pepper chicken/beef, cashew chicken, BBQ pork, etc, normally you need to marinate the meats first, to let the tastes and ingredients are absorbed by the meats.

So, what you need to prepare for basic marinating is:
1. Light soy sauce
2. Dark soy sauce
3. Black Pepper/Pepper
4. Corn Flour

Like this...


How you marinate is basically pouring all those ingredients on the meats, and mix all of them together. How much of the ingredients to use, is totally up to you and the amount of meat you want to cook. I like it a little sweet, so I will use the dark soy sauce slightly more than the light soy sauce. Black pepper is normally the last to mix (after light and dark soy sauce).

After marinating the meat, just let it be, for at least half an hour, then only you cook them.

Easy right? =)

Monday, March 22, 2010

How to Cook Rice

Trust me or not, I learnt how to cook rice, 3 days after my wedding day. Before that, I got no clue at all! And I bet, I'm not the only one out there, who are like that.

When I wanted to learn how to cook rice, everyone gave me different opinions and methods and techniques. Most common method people use is, the ratio of your rice and the water is through your index finger or something. Some taught me, if you cook 1 cup of rice, just add additional cup of water, which is 2 cups.

Well... Here's what I can suggest you, and I think it's really accurate:


1. Buy rice cooker, which will tell you the cooking method.

This is the most accurate of all. Each rice type and each rice cooker has different measurement. My mom's one uses her palm to measure the ratio of water and the rice. Friends use her index fingers. What I can say is, different people have different size of index finger, no?

My friend, Jack, who's 1.95 m tall, has a super huge palm (not to mention index finger), which is like double of mine. So, how to measure, unless there's a scientific proof saying that, your appetite is measured by the length of your index finger.

So, the most accurate one is, to buy the rice cooker, which will give you instruction on how to cook rice, like mine!

My rice cooker comes with a cup, and the instruction clearly says, 1 cup of rice will need 1.2 cup of water. So, you can never be wrong. And, 1 cup of rice is like 2 plates of rice for my husband and me.


2. Wash the rice before cooking it

You better make sure that you wash your rice before cooking it. Seriously! You never know what's hidden inside it. I normally wash the rice 3 times before I cook it. How you wash it? It's simple. Just pour the rice into the bowl or any container you can use to wash. Then, pour the water in. Wash the rice with your hands (Remember to wash your hands before that). When the color of the water changes, just pour the water out. Do it for 3 times.


3. Cook it!

After washing the rice, just put the right amount of water (based on the instruction of your rice cooker), and cook it. As simple as that!


4. Stir the rice

For my rice cooker, the electricity one, once the rice is cooked, I need to open up the rice cooker, and stir the rice. Otherwise, it will leave the top part of the rice softer than the bottom part of the rice. Whereas, my mom's rice cooker doesn't need that. So, you gotta try and see for yourself. If yours is like mine, you can always stir the rice, as soon as it's cooked.


Happy cooking!

Friday, March 12, 2010

My Rules of Cooking

First of all, I just got married. 25 January 2010. Everyone said, "For a woman to get married, they should learn how to cook. The way to man's heart is through his stomach". Well.. Not everyone, basically the old Asian's beliefs to be exact.

But... I seriously dinno how to cook when I got married. My first experience of cooking rice was, 27 January 2010. Yep.. I marked it as history, for God's sake. It didn't go very well. But second time, it went well, and I started building my confidence.

I just started my family, and I'm not working right now. So basically, we are poor and small family. 2 people. A lot of people (esp in Singapore) believe that, there's no point of cooking at home, if you are only serving for two people. Go out and buy mixed rice lah! Mixed rice only costs you less than 10 dollars per meal. That's true.

So, when I decided to learn how to cook, my rules are:

Rule #1 Easy

It seriously has to be easy. Please don't ask me to do the super difficult cooking just to get a dinner for two. Well... At least for now, when I just started to learn how to cook. Which freak wants to learn making pizza from scratch, when he/she just knows how to cook rice 1.5 months ago?

Normally, I will start preparing the dinner, 15 minutes after my hubby told me that he's going home. By starting cooking, I mean, I really start from cooking rice and the dish. By the time he's home, the food is just ready. Great timing! :)


Rule #2 Cheap

What's the point of buying 50 dollars ingredients just to cook one dinner, right? Well.. Unless it's for special occassion lah. But for daily meals, here's how I calculate. I assume, each meal costs 3 dollars (unless you go to super Ulu place just for a 2 dollars chicken rice, but you still need to calculate your transport fee though). 3 dollars per person. So, I have about 6 dollars per meal. And, I normally cook for tonight's dinner and tomorrow's lunch. So, I should cook 4 portions, which I have the budget about 12 dollars.

For example, to cook Japanese curry, you need onions (2 dollars for one big bag), chicken fillet (less than 3 dollars), carrots (less than 3 dollars), and potatoes (less than 2 dollars, for about 5 pieces or more).

So, that's how I calculate my dish. Well... Of course you gotta buy the spices, but hello... one bottle of oil, I've been using it for almost 3 months, and cook everyday, still left with half a bottle.

But, if you or your family is the typical chinese type, who can't eat with just one dish and rice, you can forget about this rule lah. But still can save a little bit, coz per dish, it costs quite cheap =)


Rule #3 No Rule is the Rule

I don't really like the cooking that have too much rule. I dunno... Maybe I'm the rebellious type, lazy type, or any type. But I honestly feel, if you want to start cooking, the less rule it is, the better. Rule can just be developed once you are familiar with the kitchen and taste of food. You can always add on some stuff or eliminate some stuff, coz everyone's taste is different, no?

I just had an argument with my hubby a few days ago, when he said, why I put some ingredients that are not normally people putting in? I said, "It's called creativity and experiments. You think how can Jamie Oliver be so famous? He does his experiments!"

So, let's just try on your own, whatever you want to cook. :) Hope you enjoy this blog!